#stampinup #creationstation #faithfulinkspirations Hello! Welcome to the Creation Station blog hop. In this edition, our design team will be showing you projects with the theme: Boxes, Baskets, and Bags (Oh My!) I’ve been busy making a bunch of really cool projects (if I say so myself) and I’m so excited to share them with you!!
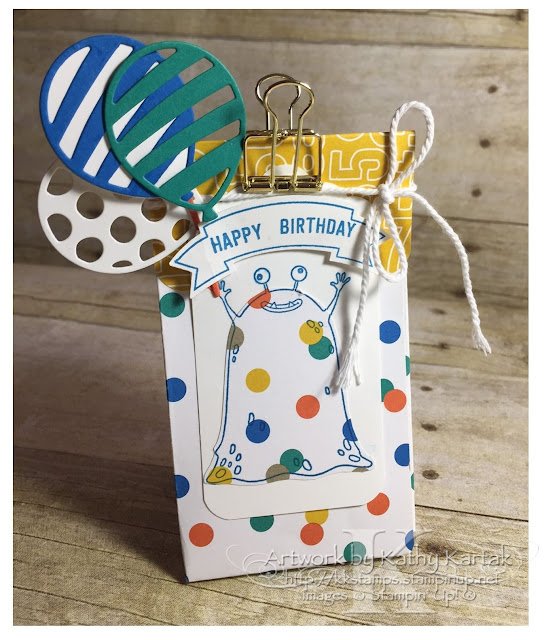
First up is is this cute little birthday treat bag. I just love the “Yummy in My Tummy” monsters! For this project, I stamped the monster in Pacific Point Ink onto a piece of Party Animal Designer Series Paper and fussy cut him. I stamped the monster again in Pacific point onto a 2″ Whisper White tag that I made with the Scalloped Tag Topper Punch…that way I didn’t have to fussy cut the monster’s arms and eye stalks!
I used the Gift Bag Punch Board to make a bag from the same sheet of Party Animal DSP. I added a topper by scoring a 2″ square of another sheet of this DSP in half and just folding overt the top of the bag. I rounded the corners with Corner Punch. The topper is held in place with a Gold Binder Clip. I also tied on a length of Whisper White Thick Baker’s Twine.
Next, I stamped a happy birthday banner in Pacific Point onto a Whisper White scrap using stamps from the “Thoughtful Banners” set. I punched the banner with the Duet Punch and adhered it to the label with Stampin’ Dimensionals so that it looks like the monster is holding up the banner.
I cut some Whisper White, Pacific Point, and Emerald Envy balloons with the Balloon Pop-Up Framelits and added them to the bag. I think my little monster treat bag is totes adorbs!!
My next project uses the 2″ by 8″ cello bags–they’re perfect for holding Hershey’s Nuggets! I wrapped the nuggets with 1″ by “3” strips of Playful Palette Designer Series Paper before dropping them into the bag.
I used the label topper framelit from the Balloon Pop-Up Framelits to make a Peekaboo Peach topper for the bag. I added a Very Vanilla piece stamped in Peekaboo Peach with a sentiment from the “Balloon Adventures” stamp set. I rounded the corners of both pieces with the Corner Rounder Punch. I tied a length of Whisper White ribbon from the Succulent Garden Combo Pack through the label. For a finishing touch, I used the Fine-Tip Glue Pen to add some Sprinkles Embellishments.
I saved my best project for last!! I seriously love the Succulent Garden suite in the Occasions catalog. I made a chocolate-filled Tiny Treat box and matching 3″ by 3″ love note card. Isn’t this a pretty gift set?
The gift card starts with a 3″ by 6″ piece of Mint Macaron Card Stock, a 2-7/8″ square of Sweet Sugarplum Card Stock, and a 2-3/4″ square of Whisper White Card Stock. I stamped the sentiment from the “Oh So Succulent” stamp set in Sweet Sugarplum. I added some Sweet Sugarplum and Mint Macaron flowers and fronds–and cut them with the coordinating Succulent Framelits. I attached them to the card with Stampin’ Dimensionals and I tied on a length of Silver Metallic Ribbon (a FREE Sale-a-Bration item).
I used my Envelope Punch Board to make a matching envelope from a sheet of Succulent Garden Designer Series Paper.
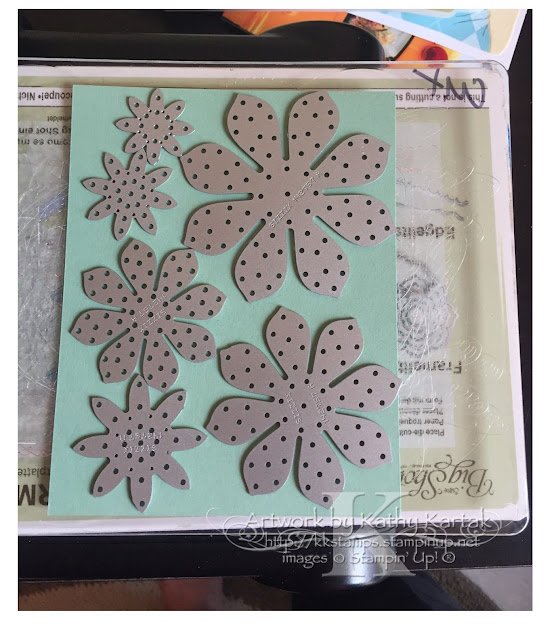
These succulent flowers are just gorgeous–and so easy to make with the Succulent Framelits Dies. You can get all the pieces of the flower onto one quarter sheet of card stock if you place it just right. Here’s how I did it.
I wasn’t sure what pieces I was going to use, so I cut all 6 pieces from Mint Macaron Card Stock and again from Sweet Sugarplum Card Stock. I decided to use just the biggest Mint Macaron piece and all, but one, of the Sweet Sugarplum pieces. I cut one small piece from Whisper White Card Stock. I stamped the tips of petals with the stamp from the “Oh So Succulent” set in Craft Whisper White Ink. Then I used my bone folder to curl the ends of all the flowers. I used the Multipurpose Liquid Glue to adhere the layers to each other. I used Stampin’ Dimensionals to attach the finished flower to the top of a Tiny Treat Box. I added a large Rhinestone Embellishment in the center of the flower.
I used the Fringe Scissors to make strips of Mint Macaron and Sweet Sugarplum Card Stock and then crumpled them in my hands. I mixed these strips with some Hershey’s Kisses and added them to the Tiny Treat Box. I wrapped a length of the Silver Metalic Ribbon around the box and here’s the finished product. I’m so thrilled with how pretty this turned out!
Now it’s time for you to hop along to the next blog where another fabulous project will await you. I hope you enjoy the hop and are inspired by the projects. Come back the first Sunday of April to see what we’ll have in store for you then!!
Product List
Product List
Product List


The Playful Palette nugget strip just makes me ready for Spring!
OHF– Oh how fun! The little monster is darling, but the nugget strip is my fave!
Just lovely; and fun! TFS!