How did it get to be May already?! Spring is in full bloom around here. I’m heading off to Arkansas this week to pack up my kiddos as their college year ends. The new Stampin’ Up Annual catalog is (just about) out! And it’s time for another Creation Station blog hop!
This month’s theme is “What Do You Sea?” So cute! I had a couple of projects made that I was going to share–but my BFF and I mixed up our bags at the Stampin’ retreat we attended last weekend and she’s out of town. That just means I need to think of something new! And I’ve got something that’s just the ticket!!
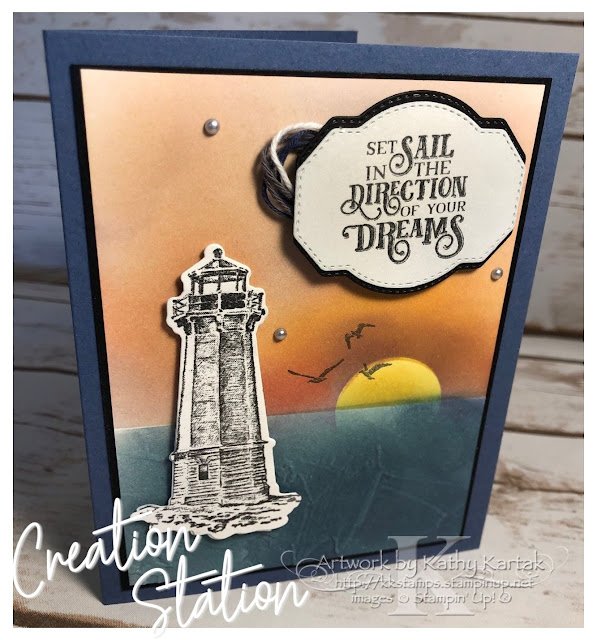
I used the “Sailing Home” stamp set and coordinating Smooth Sailing Dies to create this card. And I used the new Blending Brushes! Oh my goodness! These brushes are so soft and so easy to use. Take it from me–someone who worries about trying new things–these brushes are the bomb! Take a look at the background on this card!
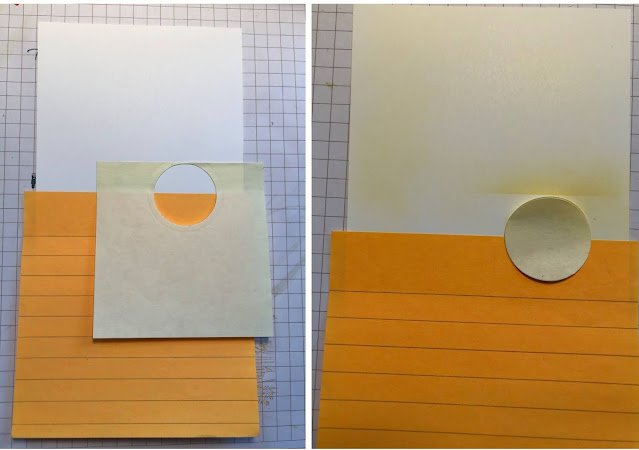
I started with a 3-3/4″ by 5″ Basic White Card Stock panel. I used the smallest of the Layering Circles Dies to cut a mask for the sun from a sticky-note. I used that negative space in that to brush on Bumblebee Ink to make the setting sun. Then I masked the sun and used a another sticky-note to mask my horizon.
Then I switched the orientation of the sticky note so I could create the water. I used Pool Party, Misty Moonlight, and Gorgeous Grape Inks. I used Highland Heather Ink along the sky-water line to blend those together.
Next, I used the Painted Texture 3D Embossing Folder to emboss just the water. I did this by lining the edge of the embossing folder against the horizon, keeping the sky free of the folder, and running the “sandwich” through the Stampin’ Cut and Emboss Machine. I was super pleased at how that turned out!
I stamped the birds image in Basic Gray Ink directly on to this panel and then adhered it to a 3-7/8″ by 5-1/8″ Basic Black Card Stock mat and then onto a Moonlight Card Stock card base.
I stamped the lighthouse in Basic Gray Ink onto Basic White Card Stock, sprinkled on Clear Stampin’ Emboss Powder and then cut it out with the matching die. I did the same for the sentiment piece. I adhered the lighthouse to the card with Stampin’ Dimensionals.
For the sentiment piece, I wanted to tone down the white so I “cleaned” my Blending Brush by rubbing the excess Misty Moonlight Ink over it. I cut another label out of Basic Black Card Stock, cut it in half, and adhered it to the sentiment piece. I adhered some twine from the Well Suited and Snail Mail Combo Packs to the back for some extra interest. I used Black Stampin’ Dimensionals to adhere the label to the card.
To finish, I added three silver Metallic Pearls to the card. I love the way this turned out. I think it is the perfect masculine graduation card, don’t you?
Next up to dazzle you with her creation is the marvelous Sara Nell Langland. Let’s sea what surprises she has for us!
Product List


Great card–love your coloring techniques.
Beautiful blending technique with the Blending Brushes, I love mine too! Stunning sunset and card. I hope you receive your bag of goodies soon.
Beautiful card Kathy! Thank you for showing us how you made it!